Christmas Folded Star Ornaments - Full Instructions

Pin It I love folded star ornaments, I try to make one a year.  Here's how I make mine. I wrote these instructions back in 2008 and posted them in a 3 part series.  I decided to bring them all together in one posting for a repeat posting.. One year I am going to try and use glue instead of pin or I'd love to find shorter pins.  Enjoy!


Folded Star Ornament - Preparing Fabric Blocks

I start out with a bunch of 2.5" blocks.  When I first wrote these instructions, I created 2.5" strips and then cut into 2.5" blocks.  Now, you could probably cut out a ton of 2.5" blocks with a die cutter if you have one.

After the squares are now in 2.5" blocks, it's time for the ironing. But first, set aside 2 blocks from each color that you will not be ironing.
  1. Step 1 - fold the 2.5" block in half. Use your spray starch if need to make it flat.
  2. Step 2 - fold the folded half block again into a square. Use your spray starch again if needed.

The order in which you prepare all of your blocks is up to you. Meaning, do you do a completely iron and fold one block completely and then move on to the next one? Or, do you iron all in half first before you move on to the next step. Up to you.

Once you have your tiny twice folded square, you now open it back up to the original half size and then we fold the edges in to meet the center fold line. Think back to when you made your paper hats. You bring the right side into the center fold line and press and then you bring the left side into the center line and press. Or, you fold them both in, hold them with your finger or tweezers and then press at once. Be careful not to burn your finger like I usually end up doing :-) You will end up with mini triangles.

Be precise when lining up the sides to the center, the closer (without overlapping) the better. Here I am holding one block before I iron it down. I would spray starch here to make sure it stays.
From here, it's just repeat, repeat, repeat until you have a pile of triangles such as this. Notice my saved blocks that have not been ironed.

Folded Star Ornament - Pinning Pieces

Now it's time to begin pinning the triangle pieces to the star. Keep in mind there are no "must follow rules" they are all left up to your individuality and how you would like to arrange the layers. Also, things won't match up perfectly. That's OK, slap on another layer and cover up the imperfection :-). Most of all, make it your own.

Place two of the unfolded squares evenly spaced apart on the foam. Pin each corner and have the corners meet from each side evenly spaced apart.


Layer 1 Step 1 - Place your first triangle directly on the flat 2.5" square just placed. Match the wide edge of the triangle with the corners of the squares. Pin the corners first and then the point. Remember, place the pin in the point in between the two folds a little below the edge. Then pull the folded flaps up and over to hide the point pin.


Layer 1 Step 2 - Complete the second triangle directly across from the first one placed, same method.
Layer 1 Step 3 - Place the 3rd triangle in the empty space besides the two just placed, match points.
Layer 1 Step 4 - Place the last triangle to finish the square. All points should match up.

Next layer, decide how large you want your center star. You should be able to fit 3 or 4 layers without using half the foam ball's space.

Layer 2 Step 1 - When you decide where you would like to start layer two, place in the point pin first and then pin down the outer corners of the triangle.


Layer 2 Step 2 - Place the second piece completely opposite of Layer 2 Step 1. Pin center, hide pin, pin corners of triangle.

Layer 2 Step 3 - Place the third piece 90 degrees from pieces 1 and 2 from layer 2. Pin center, hide pin, pin corners of triangle.

Layer 2 Step 4 - Place the 4th piece directly opposite of piece 3. Pin center, hide pin, pin corners of triangle.

Layer 2 Step 5 - Now add a 5th triangle to the areas not covered by the 4 pieces of layer 2. It's almost like another layer of the same color. You are now starting to form your star. Pin center, hide pin, pin corners of triangle.

Layer 2 Step 6 - Place the 6th piece completely opposite of Layer 2 Step 5. Pin center, hide pin, pin corners of triangle.

Layer 2 Step 7 - Place the 7th piece 90 degrees from pieces 5 and 6 from layer 2. Pin center, hide pin, pin corners of triangle.

Layer 2 Step 8 - Place the 8th piece directly opposite of piece 7. Pin center, hide pin, pin corners of triangle. You should see your first star.


Layer 3 - next color
Layer 3 Step 1 - When you decide where you would like to start layer three, place in the point pin first and then pin down the outer corners of the triangle.


Layer 3 Step 2 - Place the second piece completely opposite of Layer 3 Step 1. Pin center, hide pin, pin corners of triangle.

Layer 3 Step 3 - Place the third piece 90 degrees from pieces 1 and 2 from layer 3. Pin center, hide pin, pin corners of triangle.

Layer 3 Step 4 - Place the 4th piece directly opposite of piece 3. Pin center, hide pin, pin corners of triangle.

Layer 3 Step 5 - Now add a 5th triangle to the areas not covered by the 4 pieces of layer 3. It's almost like another layer of the same color. You are now starting to form your second star. Pin center, hide pin, pin corners of triangle.

Layer 3 Step 6 - Place the 6th piece completely opposite of Layer 3 Step 5. Pin center, hide pin, pin corners of triangle.

Layer 3 Step 7 - Place the 7th piece 90 degrees from pieces 5 and 6 from layer 3. Pin center, hide pin, pin corners of triangle.

Layer 3 Step 8 - Place the 8th piece directly opposite of piece 7. Pin center, hide pin, pin corners of triangle. You should see your second star.


If you have room for another layer without going over the half way point of the foam ball, switch colors and repeat steps from Layer 3.

Once you are done with all your layers, I sometimes go back and pin down all the exposed outer edges in prep for the ribbon or fabric wrap that will hide all the pins.

When finished, flip over the ornament and repeat all steps. I like to use opposite center color and then build out.

Folded Star Ornament - Finishing Steps

Finishing Both Sides

I finished pinning on the second side of my folded star ornament. I decided on the second side I would only place 3 layers of fabric. However, I started the center in green this time. So, when I was finished, both sides met with the green fabric. Here are photos of both finished sides.


Where the sides meet is where you will place your fabric strip or ribbon. Most times, my sides don't match up perfectly. But like I referenced previously, who cares. It's going to be covered up with fabric anyway. I just make my fabric strip a little wider to make sure I cover it all. Here are my sides. See how at one spot, they overlap a little and in another, there's a nice gap.


Finishing the Ornament


Wrap a string or measuring tape around your ornament to determine the size of ribbon or fabric you need. For this size foam ball, I'll need a 10" strip to be exact. However, I like to add a couple inches to that in case I have any issues and to make a tube at the top to act as a hanger. I usually use matching fabric (or contrasting, depends on the mood :-) 2" wide strip.


Then I fold the strip in half, right sides together and stitch a 1/4" seam down it to make an inside out tube. Turn the tube right side out and press with the seam on the inside, bottom center of the strip. I end up with a 3/4" finished strip to wrap around the ornament.


  • Optional instructions - Just fold the sides in (1/4" each) to the back center and iron to make a 1.5" strip with sides folded under. Then, fold this in half again to form the 3/4" strip. This hides the raw edges and still gives you the 3/4" strip to wrap around the ornament.
I cut the finished strip to 10" (or however long you need) and then from the excess piece I cut a 1" piece which I'll use later. On the 10" strip, I add double stick tape. Then carefully thread the one end through the 1" piece and secure with tape on the underside. This will be the hanger at the top of the ornament.

Place the area with the 1" piece on top of your ornament if you have a preferential "top". Wrap the piece around your ornament and secure. When you come to the top, feed the other end of the wrap into the 1" piece on the top of your ornament. I'll even reach in with a pin inside this piece and secure further. Now, your ornament is ready for hanging.


  • Optional instructions - just use the 10" strip and tape it to the ornament letting the ends meet at the top. Glue on a piece of fabric on top to cover the joint of the two ends where they meet at the top. Adhere something to hang the ornament.Here's the finished wrap. I like using fabric because the wrap is then very smooth.


Hang on your tree or give as a gift! Please let me know if you have any questions.
Thanks for stopping by!

Thanks for stopping by!  
~*~Trish~*~

Hunter's Star Quilt 100% Complete

Yeah, it's done!  I just finished sewing on the binding and snipping all the threads from the quilting.  I'm so happy with the results.  It ended up finishing at 48" by 56".  So, here are the final photos of the 100% complete quilt!


Thanks for stopping by!  
~*~Trish~*~

Hunter's Star Quilting Completed

I completed all the quilting on the Hunter's Star Quilt this morning.  I am shocked at my own progress.  Once I turned the radio on downstairs and started quilting, it was done within two days.  I also created a border design for the quilt using Art and Stitch software.  I traced the daisies and created a small medium and large daisy to sprinkle on the border in different patterns.  The block quilting pattern used is the Kitty and Daisies Block 13 design from One Song Needle Arts.

If you want to see the photos closer up, click on the images.  If you get the new blogger photo viewer (which I don't like) then click on the link to view the original image and then you can click again to zoom in on the photo.


Here's a close up of the border.  You know how hard it is to photograph quilting.  I love how the overall quilting turned out.  That's big for me to say because I'm my harshest critic and usually find flaws.  The quilting is so subtle on the front that you really don't see it detracting from the stars.  But, if you look carefully for the quilting pattern, it then appears.  I used Superior So Fine 401 thread for the quilt top.  The photo below also shows how I left the first two half stars with ruler work quilting.  Don't look too closely there :-)


Here is the front of the quilt.  I photographed it outside to try and have the quilting show up.


Here's the full back of the quilt.


Next step, finish stitching the corner blocks, trim the quilt and add the binding and I can actually say it is completed. 
Thanks for stopping by!  
~*~Trish~*~

Best Impulsive Decision - Hunters Star Quilt Progress

Yesterday, I set out to load the Hunter's Star Quilt top on the frame since the backing was loaded.  This is what takes the most time for me.  Making sure the quilt top is on straight since I float my quilt tops when I do quilt them.  I set out determined to use the daisy quilt design referenced before and then outline the stars with a ruler.

I ran into difficulty on the first half row of the quilt.  The half daisy design went on great but the ruler work was somewhat of a nightmare.  Where all the pieces of the star come together, it's pretty thick.  The long arm hopper foot didn't want to glide over it.  I fought with it but got the two half star blocks completed with straight ruler work. I just couldn't imagine what it would be like trying to do a full star and then also do one that was on top of the pieced backing.  I'm sure it would be a struggle.

At that moment, I made an impulsive decision to finish all blocks in the daisy design.  It was the best impulsive decision I made. The circles on the daisies circled around the lumpiest center seams on the corners of the stars.  It worked out much much better.  Here's what the placement looks like in a photoshop image.  The red dots show where the bulky seams were and how the circles went around them.


I left the first two half block stars as ruler work on both the top and bottom of the quilt.  Hopefully it doesn't look too terrible.  There's no way to know until it comes off the long arm.


Here's the actual daisy quilting on a star portion.  There were some stars that even had difficulty accepting the quilting because they were a little too bulky so there are a couple little pleats :-(


Now, on to the borders.  I was going to do simple straight lines on my regular sewing machine.  But, I decided to create a border design myself using daisies.  I'm hoping it will take up some of the ripples that I saw appearing.  I hope to finish it over the next couple of days.
Thanks for stopping by!  
~*~Trish~*~

Resized and Just About Ready

I have my microhandles on my HQ16 and I am working through some minor issues.  However, I'm still able to practice my freehand quilting and computerized quilting in preparation of loading the Hunter's Star Quilt.  However, I just realized that I did not resize the daisy block pattern I wanted to use.  It was originally a 10" design and the Hunter's star blocks ended up 8" square.  I wanted the daisy block design to fit in the checkerboard squares area like this.

With the center of the center daisy resting directly over the four corners, I was concerned with placing the block just right.  I won't get the real turnout until I complete a real block on the quilt but, I wanted to try out a theory I had.  Since the start point of the design is directly under the center of the centered daisy, I thought I would measure the start point distance from the center and use that to place the quilt design each time.  First I resized the quilt design to be a 7.8" square design,  I wanted it just a little bit smaller than the 8" block.  Here's the first stitch-out using the resized design. Don't mind the ripples, when I'm practicing, I'm not picky about fabric placement.


I measured the distance from the start point to the center of the center daisy.  This is where the 4 corners of the pink/white blocks will rest,.


For practice placement, I drew a pretend center and then measured down the proper distance to where the quilt block should begin,  I placed a dot there.  Now, when I load the quilt design, I will make sure the start point matched the dot I drew.


Here's the quilted design.  It looks like it will work just how I wanted.  I have to remember it will not always be perfectly centered but it will be close each time if I measure carefully.  Maybe one or two more days practicing and then it's time to load the Hunter's Star Quilt for quilting.  The next test I want to do is whip up a larger pink white checker-block square to see what the white on white quilting will look like,  Hopefully, I'll have that for you tomorrow.


Thanks for stopping by!  
~*~Trish~*~

Watch for Falling Branches

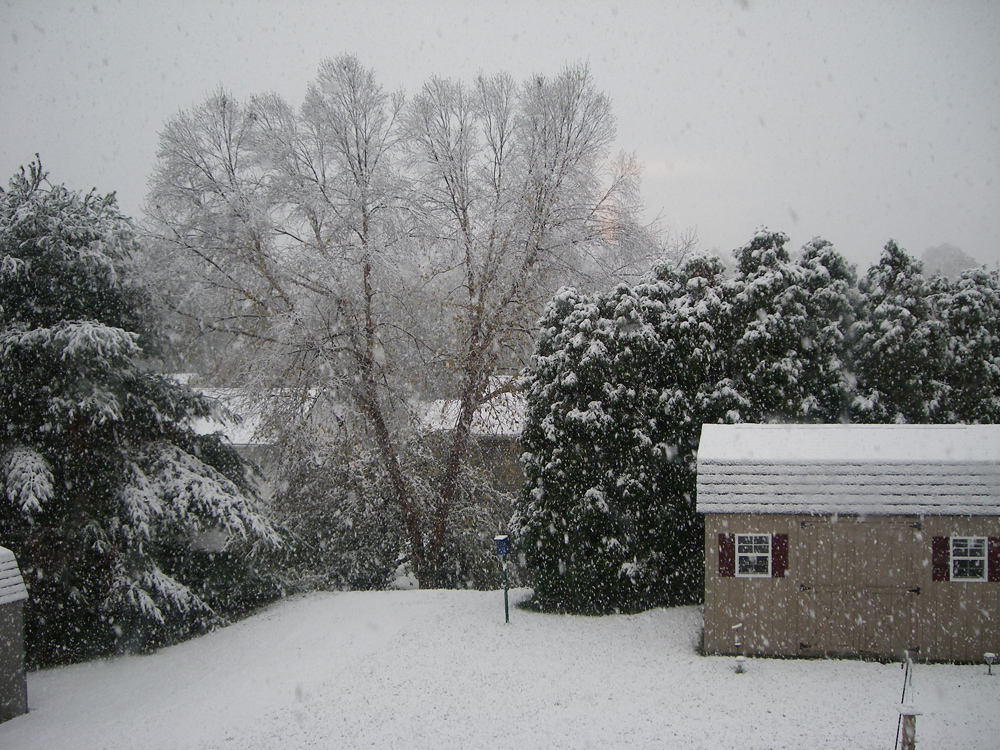
It is snowing so much here in Central PA that we are losing branches left and right on our trees in the front yard.  We don't dare walk out the front door until the snow is over...  We have to go out the back and walk around front to get photos of the branches coming down.  It's such a heavy, wet snow.   And tomorrow, I think it is supposed to be 50 degrees  hnmmmn


The neighbor said, right after I snapped the first photo of our halloween decorations with a little snow, the branch came down near where I was standing.  Whew, that was close....  Notice my masked pumpkin laying facedown in the front of the photo :-)


Thanks for stopping by!  
~*~Trish~*~

Trick or Treat???

I think someone is pulling a trick on us in the northeast.  The snow started around 2 hours ago (9am) here in Central PA.  It's pretty when you don't need to go out!  The area around the Halloween decorations is blocked from the snow by the leaves still on the tree.  It's a heavy wet snow already weighing down the dogwood tree in the background.


Update - Here's a photo of the backyard snow coming down.... Crazy


Thanks for stopping by!  
~*~Trish~*~

Outdoor Halloween Decorations

I thought we were finished with our Halloween decorations for this year, but, after assembling all the photos, I'm thinking I need a little more on my porch.  I pulled out my Halloween wall hanging quilt and had to figure out how to hang it on our new steel door.  Luckily, it was smaller than the center window.  So, I decided to get a few suction cups with hooks on them.  I got mine from amazon but I'm sure they carry similar at a dollar store type store.  To hang the quilt on the hooks, I used office binders.


Here it is centered on the window.  The suction cups are easily holding the quilt.


I didn't want to hang it on the glass screen door because I was concerned that maybe some condensation would build up and get on the quilt.  The only problem with not hanging it there is now there is a glare on the quilt during the day.  But looks great in the evening.  So, I'm OK with the evening view under the lights.  Here's where I think we need a lot more decorations.  All our decorations are in the yard.


Here's the yard decorations.  The main feature is a bale of hay and then a dollar store type scarecrow, some coleus plant from summer that grew like a weed.  A local mum that has a great burgundy color and the pumpkins in disguise.  Hard to believe Halloween is almost here. 


Thanks for stopping by!  
~*~Trish~*~

Decorating Pumpkins

Every year I say that I am going to carve an elaborate pumpkin.  You know, one of those carved masterpieces you see.  Every year I put off the carving and never get to it.  This year is no different.  However, this year I decided to create some embroidered masks to at least dress up our pumpkins.  I drew and digitized two masks.  One is a kitty cat disguise and one is a masquerade mask disguise.  I have to admit, I'm happy with the results. 

I made the cat mask first yesterday.  I digitized the design and appliqued the ears pink.  I also added metallic thread for the whiskers.  I think the whiskers part took the longest since the thread kept breaking.  I pinned on the ribbon to the side of the mask (sometimes pins are just the right craft tool) and then pinned on elastic in back.  As one of my blogging friend cleverly said... it's purrrfect.


I had so much fun with that one that I wanted to do another one.  It would be either a dog or a sparkly mask.  Any chance to use rhinestones wins the choice for me every time.  So I drew a mask outline and added an embroidery design to the overall mask.  Then I used the satin outline last around the mask.  This time, I used pliers to add grommets to the side of the mask.  This made it easier to add the elastic to the mask.  Of course I used pins to secure the eleastic again. This allows me to easily change the sizes.

It's a dreary rainy day here in central pa so my pumpkin photo is not that cheery.  However, once the sun shines later on in the week, I expect the mask to work it's magic for Mr. pumpkin. 


Thanks for stopping by!  
~*~Trish~*~

Second Breast Cancer Quilt Dedicated

My second Breast Cancer quilt was dedicated over the weekend in West Virginia.  I received information and photos yesterday after I posted my first blog entry.  So, here's another entry to show where the second quilt went to.  This one went to Belington, WV.  It's funny, I don't remember it being that small looking.   At least they were both laying flat in the photos.   I like the second photo that shows the word courage.  I always look forward to assembling these quilts each year and the inspiration they provide.


Thanks for stopping by!
~*~Trish~*~

One Breast Cancer Quilt Dedicated

I received word that one of my breast cancer quilts has been placed in Strecker Cancer Center at Marietta Memorial Hospital in Marietta, Ohio in honor of Breast Cancer month.  I understand that it will be traveling around a few offices there.   I'm so glad that others will be able to read the messages on the squares that were sent to me to sew together.  The quilt is really basic but the messages are so powerful.  Here's a few photos from the dedication that I did not attend.  I also learned that the second one will be dedicated to a clinic in West Virginia.


Thanks for stopping by!
~*~Trish~*~