I finished applying the smaller borders and smaller corner blocks to the first quilt. I'm very happy with the results. I like the notched corners that a double border makes. On this first quilt top that was mostly dark and light pink blocks, I used the black rimmed pink/white corner blocks. For the second quilt, I'll be using the dark pink rimmed corner blocks. I figured since it was already so colorful, I would keep the corners nuetral. I'm still betting with myself that before I pin this first quilt to the backing, I change that dark center block on the right of the Ford center block. If it were light pink, it would just flow better.
Thanks for stopping by!
~*~Trish~*~
Border Corner Options
I created 8 pink ribbon corner blocks for the quilt borders on the two quilts. Once completed, I tested out the use of a black outline on the ribbon. I've always like to see pink/black together. I only made one set of pink/black ribbons so we'll see which one looks better. I still have to cut the borders for now and then I'll audition them both. The pink background fabric is what I will be using for one of the borders. I love the design of this fabric and I try to use it every year.
Thanks for stopping by!
~*~Trish~*~
Thanks for stopping by!
~*~Trish~*~
Quilt 2 Assembled
I'm happy to say that the second quilt center is completely sewn. This one was a little more challenging with all the extra add ons! Now it's on to borders. I've pretty much decided to add borders to each. Although, they are a nice size now. 45" wide by about 50" long. I may add a 2" inner border of white to each with a 5" border of pink outside of that. So, I should end up around 51 wide by 56 long. I'm also going to embroider some corner ribbon blocks. I hope you like it!
Thanks for stopping by!
~*~Trish~*~
Thanks for stopping by!
~*~Trish~*~
Quilt 1 Assembled
I finished assembling sewing the center of the first Quilt for a Cure breast cancer quilt yesterday. I'm happy with all the match up seams but the center blocks are bothering me. I probably should have made the right half block a light color. Why didn't I see that before when the individual blocks were laid out? It's the right half block flanking the Ford center block.
On to assembling the second quilt center. I call them the centers because I'm thinking these quilts need borders. I'm on a schedule to finish these. I actually created a project plan to have them completed by the end of the month. Now how techno-geeky is that? So, based my plan, I have one day to decide if borders are needed and what they will look like. But, if I finish the second quilt assembly today, I'm ahead a couple days :-)
Thanks for stopping by!
~*~Trish~*~
On to assembling the second quilt center. I call them the centers because I'm thinking these quilts need borders. I'm on a schedule to finish these. I actually created a project plan to have them completed by the end of the month. Now how techno-geeky is that? So, based my plan, I have one day to decide if borders are needed and what they will look like. But, if I finish the second quilt assembly today, I'm ahead a couple days :-)
Thanks for stopping by!
~*~Trish~*~
Second Quilt Layout
I now have the quilt layout decided upon for the second Breast Center Quilt for the Cure quilt. It seems that the more variety of blocks that are presented, the longer it takes to decide upon a favored layout. Here it is.. There is only one block that kinda sticks out of place for me. it's the big blue velvet bow on the middle left side. But, there it will stay. Now it's time to sew these two quilts together. That should go pretty quick. My favorite are the 4 center corner denim embroidered roses.
Thanks for stopping by!
~*~Trish~*~
Thanks for stopping by!
~*~Trish~*~
No Block Left Behind
When I was trimming most of the blocks in the second set of quilt blocks, there were about 8+ blocks that were not the correct size of 5" squared. Donors are asked to create their quilt blocks with 5" square leaving 1/2 inch area around the square for seams. My initial thought was to leave these couple out. We all know when a block is too small, the quilt top does funny things. Even an 1/8th too small makes an impact to the way the quilt lays.
Then, I stepped back and asked myself to make them work somehow. I remembered I had a few blank precut 5" squares from previous quilt. I then decided to applique the too small blocks onto the right size blocks. Now, no block is left behind. I'm pretty happy these turned out the way I wanted them to. Now, I just need to figure out a layout for all these colorful blocks and then I'll be able to start sewing.
Thanks for stopping by!
~*~Trish~*~
Then, I stepped back and asked myself to make them work somehow. I remembered I had a few blank precut 5" squares from previous quilt. I then decided to applique the too small blocks onto the right size blocks. Now, no block is left behind. I'm pretty happy these turned out the way I wanted them to. Now, I just need to figure out a layout for all these colorful blocks and then I'll be able to start sewing.
Thanks for stopping by!
~*~Trish~*~
Heartfelt Blocks
I've started on the first breast cancer quilt for this years Quilting for a Cure. I like to take the time and look and read each block received for each quilt I have volunteered to complete. Here are a few of my favorite blocks from the first quilt bunch. This quilt had 110 5" blocks. Therefore, I'll have a 10 block columns by a 11 block rows quilt. I also have the Ford block for the center of the quilt. I have not decided on whether there will be borders or not as of yet.
After I received each block, I place them in color categories and count them up. I try to randomize them as much as possible. By this, I mean I try to separate the similar colors. This bunch had one blue block. It's a beautiful embroidered block. I know that anywhere I place this block, it will stand out. Below is a montage of the layouts. I love using the camera to help me see the color values and it allows me to see where there a too many light like blocks and too many like dark blocks. This layout only took me about 4 tries. There is an imbalance of dark stripes on the lower left versus the top right but I think it still works. On the final (4) bottom left there seem to be 4 dark diagonal stripes and on the top right there are only 3, but I like it. What do you think? That's it for today, maybe tomorrow I'll start sewing them together.
Thanks for stopping by!
~*~Trish~*~
After I received each block, I place them in color categories and count them up. I try to randomize them as much as possible. By this, I mean I try to separate the similar colors. This bunch had one blue block. It's a beautiful embroidered block. I know that anywhere I place this block, it will stand out. Below is a montage of the layouts. I love using the camera to help me see the color values and it allows me to see where there a too many light like blocks and too many like dark blocks. This layout only took me about 4 tries. There is an imbalance of dark stripes on the lower left versus the top right but I think it still works. On the final (4) bottom left there seem to be 4 dark diagonal stripes and on the top right there are only 3, but I like it. What do you think? That's it for today, maybe tomorrow I'll start sewing them together.
Thanks for stopping by!
~*~Trish~*~
Combining Crafts for my Valentine Day Card
I am working on my Valentines Day card for this year. It takes me a couple days to decided what I want to do each year. This year, I was wanted to use my AccuQuilt Heart Die but step it up even more. I thought I would applique it to a background fabric first and then add a embroidered design on top of it. It took me a couple tries to get the embroidery just right around the heart. Then, of course, I needed to figure out how to put some bling on it. I thought I would add a sparkle in the center of each flower embroidered with heat set rhinestones. I just can't get a great photo of it but I'm really pleased with the outcome.
Next steps are to send this cut out heart through the Xyron to add a permanent adhesive to the back and then I'll try and incorporate it into this years card. More to come when the card takes more shape. Hope you are having a great weekend!
Thanks for stopping by!
~*~Trish~*~
Next steps are to send this cut out heart through the Xyron to add a permanent adhesive to the back and then I'll try and incorporate it into this years card. More to come when the card takes more shape. Hope you are having a great weekend!
Thanks for stopping by!
~*~Trish~*~
On the road photos & Quilt dedication
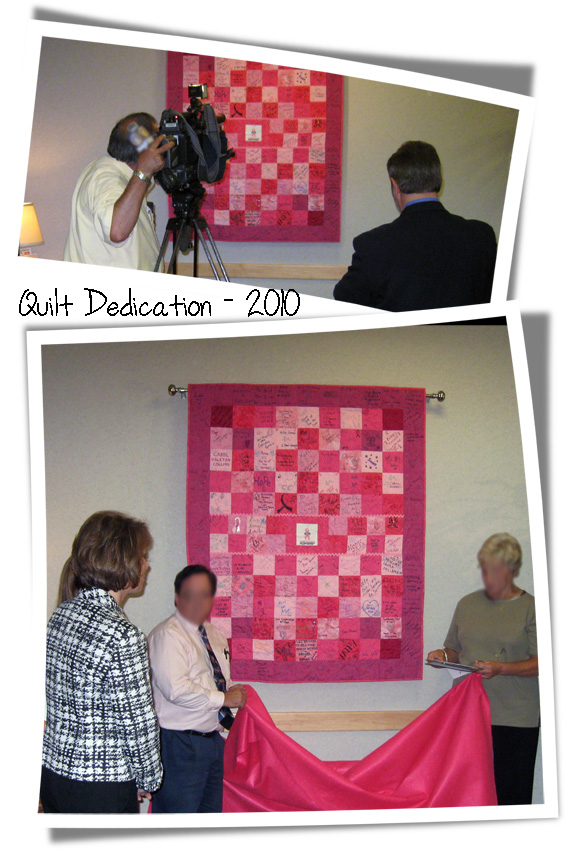
Here are the final photos from our recent vacation. The first set is from my favorite city - Pittsburgh, PA. These were taken from the passenger seat in a moving car. Not too bad. The second collage of photos is from the quilt dedication. It was funny to me how small the quilt looked on the wall. However, it was the smaller of the two completed and this is what was chosen. It even made a few seconds on the local news that day. Have a great day!
Thanks for stopping by!
~*~Trish~*~
Thanks for stopping by!
~*~Trish~*~
Great Weekend - Two Quilts Completed & Photographing Quilts
Yeah!! I completed the bindings on both Breast Cancer quilts! I also re-added the bobbles that were removed for quilting. Finally, I added the last of the ric rac trim to the second quilt. I really enjoy working on these quilts but I also enjoy finishing them. It's a sense of relief knowing I am completed. Now, I just need to package them up and send them out. First, I'll contact the coordinator. I may need to add a hanging sleeve so I may have one more step to go.
Photographing Quilts
How do you photograph your quilts. It's hard to find an area to get a good photo of my completed quilts. I currently hang them over the entry way banister however, it adds a bow in the center when the quilt goes over the carpet floor that extends under the banister. I've tried photographing them on the floor, but, then you get a a very large angular photo. Unfortunately, I do not have the room to create a design wall. Looking forward to hearing your tips!
Thanks for stopping by!
~*~Trish~*~
Photographing Quilts
How do you photograph your quilts. It's hard to find an area to get a good photo of my completed quilts. I currently hang them over the entry way banister however, it adds a bow in the center when the quilt goes over the carpet floor that extends under the banister. I've tried photographing them on the floor, but, then you get a a very large angular photo. Unfortunately, I do not have the room to create a design wall. Looking forward to hearing your tips!
Thanks for stopping by!
~*~Trish~*~
First Breast Cancer Quilt top Quilted
I quilted the first Breast Cancer quilt on the ProStitcher this weekend. I was able to complete it there because there were not too many bobbles added to the quilt blocks. However, I managed to hit one rhinestone with the quilt machine. Luckily, nothing seems to be damaged. After that rhinestone, I had a little bit of difficulty getting the pattern lined up again. When the ribbon should have been higher, it was lower, and vice versa. So, one band of ribbons is out of synch. You can't see it too much on the front but I know it's there (not in the photo below). Here's a section where you can see the quilting pattern that was completed. Now all it needs is the binding and it's ready to go.
Thanks for stopping by!
~*~Trish~*~
Thanks for stopping by!
~*~Trish~*~
Entering Pets on Quilts contest - Pomeranian Memory Quilt
This is my favorite memory quilt that I created. It was for friends that always loved their Pomeranian dogs Hopper and Bandit. They wanted a way to remember them and here is what I came up with. The layout was just something that came together without a pattern. It was also my first applique using the dog paws. I hope you like it for my entry into the Pets on Quilts contents sponsored by SewCalGal The contest runs until August 21rst. It will be my first contest entry.
Thanks for stopping by!
~*~Trish~*~
Thanks for stopping by!
~*~Trish~*~
Layout Change - Breast Cancer Quilts
I'm not a square quilt kind of person. When the measurements add up to form a square, I do everything to add more height. Add it to my list of quirks. But yet, when I see other people make square quilts, I like them. Go figure.
I tested out the breast cancer quilt with the horizontal spacer rows between every 4 rows. Well I did one and then used graphics software to crudely add in the other solid fabric strips. I did not like how that turned out. So, since it was digital, no seam ripping needed.
I went from there to a totally random layout of all the blocks. I shortened the width from the center panel shown in the previous quilt and added more rows. Thus, I got the rectangle I was looking for. Here are all of the blocks out on top of the bed quilt before I started sewing. I'll show the completed quilt top in a day or two vertically so you can see all the fantastic blocks and sayings! One more quilt top to lay out. I think I'll go with the same layout since there are so many colors in that bag of blocks as well.
Thanks for stopping by!
~*~Trish~*~
I tested out the breast cancer quilt with the horizontal spacer rows between every 4 rows. Well I did one and then used graphics software to crudely add in the other solid fabric strips. I did not like how that turned out. So, since it was digital, no seam ripping needed.
I went from there to a totally random layout of all the blocks. I shortened the width from the center panel shown in the previous quilt and added more rows. Thus, I got the rectangle I was looking for. Here are all of the blocks out on top of the bed quilt before I started sewing. I'll show the completed quilt top in a day or two vertically so you can see all the fantastic blocks and sayings! One more quilt top to lay out. I think I'll go with the same layout since there are so many colors in that bag of blocks as well.
Thanks for stopping by!
~*~Trish~*~
Gone Fishin - Quilting Completed
I finished my Gone Fishin quilt over the weekend. I combined two different quilting designs to the quilt. One was a repeated single fish that came with the free designs of the HQProstitcher and one that a friend (Hi Linda) made for me of a few random bubbles. I quilted the whole thing with the fishes first and didn't like the "space" between the fishing poles and the fish above. So, I asked my friend to help with digitizing a few bubbles. I did not want lines between the bubbles so I asked for jumps between them all. I knew that meant a lot of snipping threads between each bubble on both front and back.
The photos above and below show the end results. It's always difficult for me to photograph the quilting. I hope you can see it a little. In addition to the fishing pattern and bubbles patterns, I also placed random singular bubbles everywhere. One other thing, of course I did not line up the patterns and had extra space at the bottom of the quilt. So, I added some water waves at the very bottom for the fishes.
Thanks for stopping by!
~*~Trish~*~
Trish's Tools - Joining Batting Pieces with Batting Tape - Part 2
I spent the day yesterday quilting up a T Shirt quilt that I have had the top for a long time. I'll share photos of the full quilt sometime later in the week.Here's some photos. If you stare long enough at the one with the green box, you might convince yourself that you see the tape. Really, I can not pick it out from the front or back of the quilt. Only where I can see the ends sticking out waiting to be cut off. To see more detail, click on the photos to enlarge.
Thanks for stopping by!
~*~Trish~*~
Subscribe to:
Posts (Atom)